
Sorry for the radio silence, but between the jeans breaking my machine and one of my medications being raised, I’ve been a little bit off last week. The jeans took a bit longer than expected and they fit worse than expected too. The change in the medication makes me nauseous in the morning and tired in the afternoon-evening, so after work I didn’t manage to do anything else but sitting on the couch with my knitting and watching the 100. Series 1 was okay, but series 2 is pretty damn addictive! I just hope finishing it soon and get on with my life. I think things are going better and today I’m feeling better than previous days, so I gathered the strength to write this post (twice again, since WordPress ate my first version).
As I told you before, I was torn between the Ginger Jeans and the Angela Woolf Bootcut Jean. Since the latter is similar to the jeans I’m wearing nowadays, I went with this one. Plus, I hate skinny jeans on me, and the Ginger Jeans would have needed a strong modification of the leg to make them wearable outside the house. I’ve read that the Ginger Jeans fit big booties well, and I was a bit sad that I couldn’t find all that I needed in one pattern, but I thought that after giving a first try to the Angela Wolf I could make the needed modifications for future pairs.

The pattern is drafted with a 34” inseam, so I shortened 3” to start with. I should have remembered that my ideal length in my teenage days was 30″ and I would I have saved me from chopping off an extra inch after the jeans were made. I trusted the sizing and found that these feel like a size larger than the RTW jeans I’m wearing nowadays. It’s not something bad though, because I started to do more sports two weeks ago and I never lose weight in these cases (it’s not my intention anyway), but I tend to develop quite some muscle, especially on my thighs (like a female version of the Hulk). Even like that, they don’t fit like the pictures on the pattern instructions, so if you want that, you will need to size down. I used a similar fabric to the one specified in the requirements, and after wearing it on Saturday, I feel it quite loose. In the pictures it looks okay though, so it could be that I’m just used to my too tight RTW jeans.

I didn’t make any important modifications to these jeans, except leaving the 7 cm wide waistband in 4 cm. The original needed two buttons and looked horribly wide. I measured the one of my RTW and it’s how I decided how wide this one was going to be. It looks ok. I didn’t modify anything else since I was not sure how Angela Wolf patterns fit. I wanted to make a wearable muslin and then then adjust the pattern for a future pair. I was a bit disappointed though. The waist is huge. I already suspected this when I was cutting my pieces but I continued anyway. You can see the wrinkles under my belt. They feel annoying but nothing new since this happens with all my RTW jeans. I expected a better fit here since this is a common complain among women (and even men). Do the Ginger jeans fit better here?

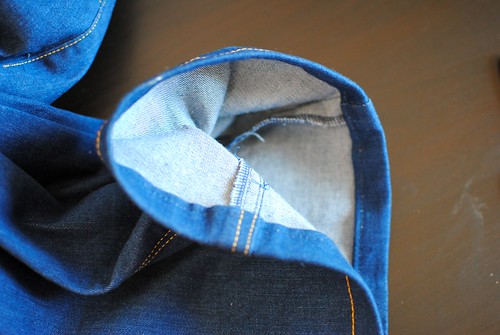
I just have one functional sewing machine, so I had to switch the upper thread all the time, but it’s not as bad as other people say, since the bobbin thread keeps being the same. I had to pay attention to adjust the tension though, since the topstitching thread needed a higher tension. And even like that it kept giving little problems, even after my machine came back from being repaired. At random moments you could see a loop showing on the back of the fabric like in the picture below. The topstitching looks generally okay though, except where it curves on the fly. I redid this part but the second time was not better than the first. Well, you only see it from close.
I learned how to use my blind hem foot to sew parallel stitching lines. It could be used too as a stitch in the ditch foot. Now I need to learn how to use it to what is intended for 😉

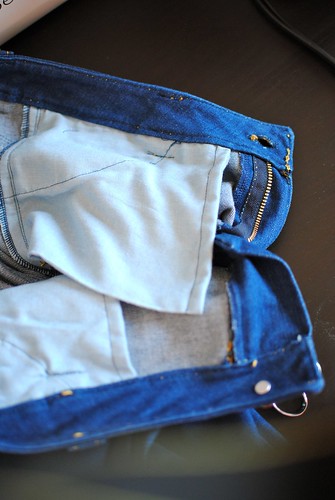
I used washaway quilters tape to place the back pockets and the zipper, and also for folding in the lower edge of the waistband facing. Even though the default seam allowance for this pattern is 5/8”, in some places it’s smaller, eliminating trimming. The waistband seam allowance is 1/4” (6 mm) so the washaway tape was very helpful. These different seam allowances are specified in the pattern instructions and on the pattern pieces, so it’s almost impossible to miss them.

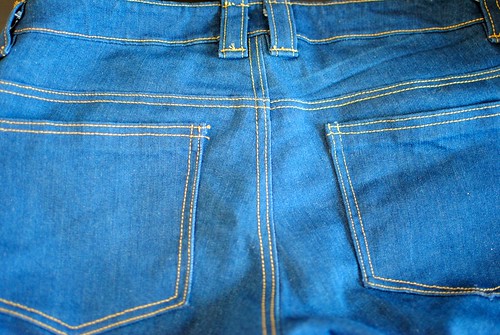
The instructions are clearly written and they even include a link about distressing. I didn’t have any doubts and installing the zipper was also very straight forward just by following the instructions. One thing I liked is that they have you shift a little the back pieces, so that after topstitching the back pockets look symmetrical, and not one of them closer to the center topstitching. I managed to place them more or less, and after washing them (to remove the washaway tape) they look ok. They seemed a bit large the first time I saw them on the jeans, or too dull due to lack of topstitching, but I now think they look fine.
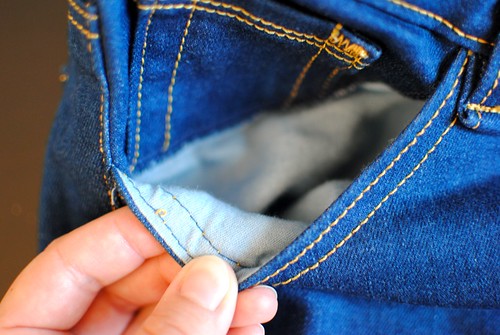
The front pockets are too small for my liking since my hands don’t fit completely, and definitely smaller than any RTW jeans I’ve ever owned.
As it was already at the end, and after two weeks I started with these jeans, I didn’t want to take more time and modify it, but the hem of these jeans is a bit too wide. It feels a bit too handmade for me. Something to point out is that this pattern uses faux felled seams. I was a bit afraid beforehand of doing real felled seams on denim but since they are all faux felled, everything went more or less smooth.
The buttonhole was a pain in the ass, as usual. I did several tests on pieces of fabric and some were more or less right, but on the real waistband they always came too short, even helping my machine to move the fabric. I ended up doing it manually with a zigzag stitch. I just hate my machine when making buttonholes. At least my buttonhole is not too bad and it’s quite sturdy. I applied some fray check before cutting it open.

I was going to add rivets but after such a long project and my energy levels not too high I just skipped them. Also, the fit is far from perfect, so I decided not to throw more time and effort on these jeans. Maybe when my strength is back I’ll think differently. You also see that I don’t look wonderful in the pictures. I took them on Thursday during my lunch break and the nausea didn’t let me do much, so I skipped the usual make up I apply for taking pictures.
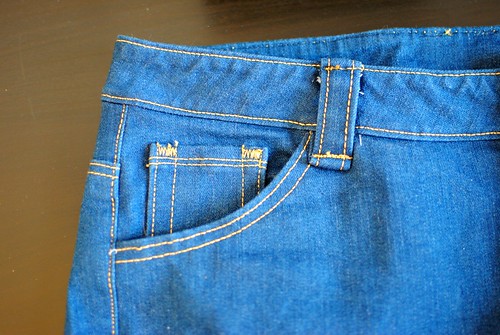
The belt loops are too wide, so I’ll narrow them for next time. And they were a pain to sew in. On the upper part your needle needs to go through TEN layers of denim so you can imagine that even going very slow with a recently oiled machine is not going to work wonders. During a couple of seconds I even thought if I could glue them to the waistband, or staple them, or bite them in place. It was a pain!

Now that I see them in the pictures I have to say that I like them better. I would like to make another pair with the mentioned modifications, or go for the Ginger jeans. I don’t know. What I know is that I’m going to let my machine rest from the denim for a while and let her sew soft and thin cotton.
And you? Have you made jeans before? Have you tried any of the mentioned patterns? Just tell me your experience.
you did an awesome job! I quit jeans over a year ago so I don’t know how’s to sew them, but you did a pretty good job! I think the ginger are more tight fitting or at least it is what I understood from the ladies around the web who made them! I hope your medication will work and help you go through this delicate phase. un gran abrazo y un beso!
Yes, the clear difference is the leg shape, but I don’t know about the waist. I guess I will only know if I make them. The medication is going a bit better, at least I have more energy and the nausea is mostly gone 😉
I think your jeans look great! I’m impressed that you actually made jeans! 🙂 I have trouble even hemming jeans on my machine because of the thickness at the seams. My mom (who once worked at an alterations shop) said that they would hand-walk the machines over the seams. My last attempt was recently to “magic hem” my jeans on my new serger and it knocked my knife out of alignment. I have officially given up on denim. 🙂
Your jeans were total killrs! This is stretch denim, and probably a little bit softer than the traditional one. My machine had issues sometimes, but my serger none. It serged and cut without problems. Anyway, I’m going to wait for a little while before sewing denim again and enjoy easier fabrics for some time 😉
They look good, I think! I have made jeans before, and have attempted several patterns (but neither of the ones you mentioned) before finally just drafting my own in the Craftsy Jean-ius class. But I think that once I’m done being pregnant and my body is at whatever new normal will be, I’m going to try the Gingers. One trick that might help you the next time you try it on those multiple layer sections is to whack the fabric a few times with a hammer before sewing. I have a rubber mallet that I use just for that sort of thing, and it really does help things fit under the presser foot better!
Thank you! I did use a hammer when I needed to sew multiple layers. I helped, but even like that, ten layers of denim is a lot for my sewing machine.
I think they look brilliant, and the top stitching looks amazing. I see what you mean about the waistband being too big, this is a problem I also have with RTW jeans.
Thank you, Lynne! This is a very common issue, so I expected them to be better regarding this. Anyway, I’ll modify this part for the next time.
I am soooo impressed by your sewing skills! This pair of jeans came out great. Can’t stop admiring your perfectly lined stitches.
Thank you Dona! The blind hem foot helped a lot in making those straight lines. I also like how they look 🙂
The jeans look great, and your stitching so straight! They fit pretty well for no modifications, too. Hopefully you will get the energy to make another pair to perfect the fit. I second the hammer use. I got a small piece of wood and used that over the denim to prevent the hammer from marking the fabric. I pounded quite a lot on each thick section to get it nice and soft. It really helped on the upper back pocket corners and the belt loops. It is definitely still hard to sew through so many layers, though.
Thank you for the tops. I ended up exhausted after making these but I’ve been wearing them non stop, so soon I’ll sew another pair with the right mods.